WordPress.com Stats Plugin
Since the day after I started my blog until yesterday (a span of 3 weeks), the WordPress.com Stats plug-in has not worked for me. I wasn’t sure why but I didn’t make it a priority because I’ve setup Google Analytics to track visitor trends and site referrals. I was fixing a couple bugs yesterday and decided to tackle this problem too. Fortunately, and admittedly a little embarrassing, the fix was very simple. I had forgotten to call the wp_footer(); hook in my footer.php file.
While researching this problem, I discovered a number of people having similar problems as old as 3 years and as recent as 4 months ago. Hopefully the following walk-through to installing this plug-in proves valuable to some.
Getting An API Key
This plugin works on all WordPress blogs, not just hosted on WordPress.com or WordPress.org. It requires an API key like a password to collect and store your site statistics, so you need a WordPress.com username. You don’t need to setup a blog to get one because you can register just a username here.
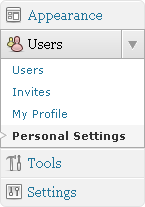
After you’ve setup the account and did the email verification, log in to WordPress.com and go to Users > Personal Settings, which you’ll find in drop-down menu on the left.
At the top of this page, you’ll see your 12 character WordPress.com API key followed by the important note “Don’t share your API key, it’s like a password.” Write this down temporarily.

Installing
Installing the plug-in is pretty simple and can be done two different ways:
Automatically: Log in to your WordPress blog on your website as the administrator and go to the Plugins page. At the top is the link to add a new plugin. From there, you can search for the name of the plugin (“WordPress.com Stats”). Within the long list of search results, you’ll find the plug-in with the exact name as your search query. The description says it’s developed by Automattic (the organization that develops WordPress) and it’s presently in version 1.8.1.

Click the Install Now button and you’ll be directed to a page showing the installation details. Once it’s successful, click the Activate Plugin link. The plug-in is now activated, but you’ll be notified it needs the API key, so click the link in the attention bar or the plug-in’s page in the left menu. From here, enter your API key and you’re pretty much done.
Manually: Because I test all the changes to the site in a development area and I like to keep backups of all the site files, I install the plug-ins manually. Download the files from the Plugin Directory in a compressed (.zip) file, decompress them with your favorite archive program like WinRAR, 7-Zip, or WinZip, and follow the few installation steps.
Double-check
If you’re using a theme on your website that you got from WordPress.org Free Themes Directory, you probably don’t need to do this last thing, but it’s good to double-check anyway.
I created the theme for Computer Tech Tips manually and used the default WordPress theme (Twenty Ten) as a guide for the PHP files. The reason why this plug-in wasn’t working during the three weeks was because I had forgotten to add a call to the “hook” where the plug-in is displayed. Silly, huh? In your theme’s footer.php file, right before the closing body element (</body>), call that hook:
<?php wp_footer(); ?>
At first, all you’ll see in your page’s source code is a comment like this:
<!--stats_footer_test-->
The plug-in will take about 20 minutes to get started. Afterward, you’ll see references to two scripts in your page’s source code. You don’t necessarily need to call this hook at the very bottom of the page either. I put mine in the Footer element above some less important scripts.
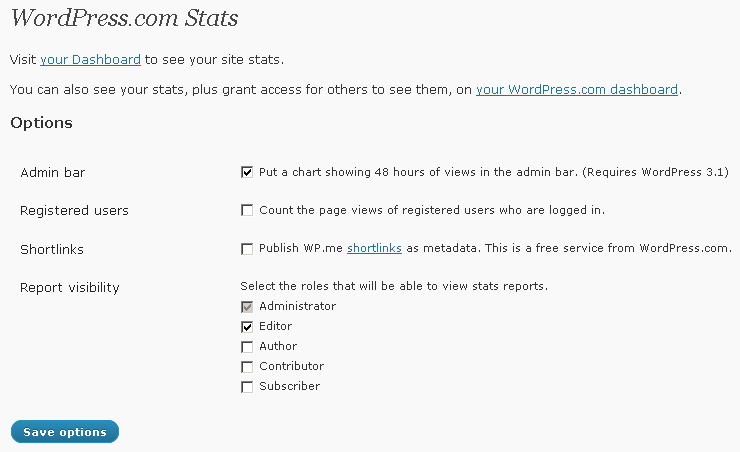
Now that you got it all setup, you can configure it to your liking. Go to the plug-in’s settings page and choose from a few different options, including the ability to allow user groups other than Administrator to view your stats. Maybe you want to share the stats with an Editor of the blog.