Installing AVG Free 2011
By Xps. 4 Comments
On September 28th, AVG Technologies released the latest version of their anti-virus client AVG Anti-virus 2011 (a.k.a. AVG version 10 as it’s called on the program’s About window). It comes in three editions: Internet Security, Anti-virus, and Anti-virus Free. For those that use a different anti-virus client, you can still use the free LinkScanner tool for safer online web browsing. It is built into all three editions of AVG Anti-virus.
Now, let’s install AVG Free 2011! For those of you currently running AVG Free 9.0, the AVG F.A.Q. says you can carry program settings from the old to the new by installing version 2011 over version 9.0. During setup, version 9.0 will be removed for you, but you should expect to restart your computer during the process.
Using The Installer
Head on over to the AVG Anti-virus 2011 Free Download page for the 4MB Installer. The Installer allows you to pick the components you want and then will download the appropriate files. That way you won’t download a larger setup program than you need. The first step of the process is to agree to the License Agreement.

Then, we’re asked if we want to install a free trial of the whole AVG Internet Security package or just the Anti-virus Free edition. We’ll be using the Free edition.

Next, is where we’d enter in the License Number. Since this is the Free edition, the field is populated automatically.

Now, we’ve got an important step to take: Quick Install or Custom Install. I emphatically recommend choosing Custom Install on all program installations. So often, people skip through installation wizards and choose quick installation, then wonder where Program X came from. A lot of times, quick installations will come with tools and features that most people don’t want or need. So, save yourself some trouble later on and always go with Custom Install on every program installation. It gives you the chance to learn more about the program and choose exactly what you want installed. After saying all that, of course we choose Custom Install.

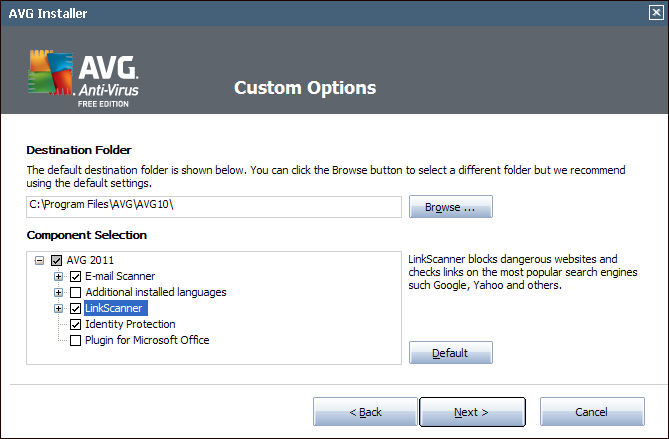
The Destination folder looks good. It will install the program inside the Program Files folder (as I suggest all programs be installed to), then in a sub-folder named after the organization, then in a sub-folder named after the program.
The default components need tweaking. By default, the option for Additional languages is checked even though no actual languages are being installed. Since I’ll stick exclusively to English, I don’t need an option to switch languages. The Personal E-mail Scanner, Search-Shield & Surf-Shield (apart of LinkScanner), and Identity Protection are all recommend components to install. They provide safer e-mail transfers, safer web browsing, and monitor programs that could lead to identity theft. So long as you scan Office documents you downloaded from a friend or colleague before you open them, you won’t need the Microsoft Office plugin.
After the whole program is downloaded including the components you selected, the setup will continue. However helpful the AVG Security Toolbar may be, LinkScanner is already being installed. I prefer a minimal number of toolbars. If you choose later on, you can install the toolbar in the Advanced Settings window of the program. Un-checking this will also disable changing your web browser’s default search engine to Yahoo.

At the end of installation, you’re asked to register your name and email if you want to get product news later on. You can also choose to participate in the Product Involvement Program. If you’re not interested in those, just leave them blank and “Finish” the installation wizard.

After installing, you should update all available malware definitions and run a full system scan. The initial scan may take a while, but subsequent scans should be shorter.

Skipping The Installer
I’m not a fan of Installers and prefer downloading the Setup files manually. That way, all my downloads are organized and I can also make use of them if I’m away from an Internet connection. Hey, it happens. You can download the Setup file directly by going to FileHippo.com and selecting the appropriate 32-bit/64-bit for your computer. The installation process is near identical to using the Installer, including selecting the components. The only difference is that the installation doesn’t need to download files during the process. Most people will be satisfied with the Installer, but it’s always nice to be aware of alternatives.
If you have questions or problems with AVG Free, you’re welcome to ask me or visit the AVG Support Center for access to the F.A.Q., discussion forums, specific virus removal tools, and product release notes.
Comments (4)
-
[…] I install AVG Free 2011 over 9.0? You do not need to uninstall AVG 9.0 before beginning to install AVG 2011. During the installation, version 9.0 will be removed automatically before version 2011′s […]
-
 alpha says:
 Well … thanks for your info … but I have need to install this to flash drive so that I can use flashdrive to move over to infected computer in safe mode. Thing is, my free AVG 2011 had “greyed out” the destination directory, so I don’t think it will help for what I need … Any thoughts you might have would be appreciatedd.
-
Hi Alpha. You won’t be able to install it on your flash drive from one computer and run it on another computer because AVG, like most programs, creates registry keys on the computer you installed it to. The malware infected PC doesn’t have those registry keys so it wouldn’t work.
What you’re looking for are portable programs to put on your flash drive and run off the malware infected PC. Portable programs don’t install (or need to uninstall), they just run. AVG created a portable one called Rescue CD which you can put on the flash drive and then boot from it. There is a detailed User Guide that directs you in setting up the Rescue CD and how to use it.
http://www.avg.com/us-en/avg-rescue-cd
http://www.avg.com/us-en/226386One of my favorite anti-malware programs to use is called SuperAntiSpyware Free. SAS can run in regular boot or Safe Mode. You can also download the portable version here:
http://www.superantispyware.com/portablescanner.htmlPlease let me know how it turns out.
[…] ComputerTechTips.net Tech Tips, Discussion, & Troubleshooting Skip to content HomeAbout UsAdvertiseContactPrivacy PolicySite MapTag Cloud ← Installing AVG Free 2011 […]